ECG Low Frequency Response Impulse test (0.05Hz, 3mV/100ms test)

Recently Derek Qin of Draeger pointed out that at the end of the MEDTEQ article on ECG filters, the graph showing the effect of a 3mV/100ms impulse on a 0.05Hz high pass filter had a post impulse slope that looked more like 29µV rather than the claimed 291µV.

It turns that Derek was right, the correct answer is 29µV/s, but there’s actually a lot more to the story of this apparently simple test.

The mistake, by the way, escaped through the usual checking process of calculation by two different methods: first by excel step-wise simulation and the next with simple math for exponential decay and the derivative. Both had different errors, and by chance both errors arrived at ~291µV/s.

But perhaps it was more than a rare double mistake. Compared to actual test results, 29µV/s is far too low. And why have a limit of 300µV/s if the practical result is <10%. So it’s likely that bias played a role. In fact, when tackling this issue 10 years later, the author was convinced it was 29, and then reverted to 291, before finally settling back to 29. And this still did nothing to explain the difference with real world test results or why the limit is so high.

After throwing around a few ideas, Derek again came to the rescue by pointing out that my original calculations were based on a single, uni-polar pulse in isolation. In the case of a series of pulses (pulse train), the results can be widely different due to the waveform shifting down to accommodate the dc offset, which then dramatically increases the absolute value of the overshoot, relative to the dc level. This in turn increases the slope of the decay. This can be best seen by looking closely at the following image:

A pulse train of 3mV/100ms impulses repeated at 0.5Hz (30bpm), expanded to see the effect around the baseline. The slope of the last pulse is clearly different to the slope of the first pulse

(click on the image to expand)

It turns out that in the case of a pulse train, the results will depend on:

(a) The pulse frequency (pulse repetition rate)

(b) The time the test is run (which pulse in the sequence), and

(c) The simulator’s offset

Clearly, this is not intuitive, so let’s run through the math starting off again with a single unipolar 3mV/100ms pulse (for those not interested in the math, jump to the conclusion):

Overshoot: The initial 3mV positive edge passes through the high pass filter without distortion, and then starts to decay based on the time constant τ = 2πf = 3.18s. The decay after 100ms is D = A(1- exp(-t/τ)) = 3mV x (1- exp(-0.1/3.18)) = 0.093mV = 93µV. The 3mV negative edge at the end of the pulse also passes through the filter. Since the waveform has decayed 93µV, this decay value appears directly as an overshoot.

Slope: The slope is then calculated from the derivative of the exponential decay, using the overshoot as the starting amplitude A:
S = -A/τ = - -92.87µV / 3.183s = +29µV/s

Now let’s take a look at a pulse train, first using 1Hz frequency (60bpm), which has been allowed to “settle”. A 0.05Hz filter has a time constant of 3.18s, so it takes about 15s to 20s to stabilise after any shift in dc offset (15s = 1% error, 20s =0.2% error). A 3mV/100ms pulse repeated at 1Hz has an initial dc offset of 0.3mV and will eventually settle to a waveform with maximum +2.7mV and minimum -0.3mV relative to the dc level. We can then re-calculate using the above method, but with these settled values:

Overshoot: D = A (1- exp(-t/τ)) = 2.7mV x (1-exp(-0.1/3.18)) = 0.0825mV = 83.5µV

Slope: The new slope is calculated based on the overshoot and the -0.3mV (-300µV) offset that is the minimum of the settled waveform. Thus,
S = -A/τ = - (-300-83.5)µV / 3.183s = +121µV/s.

We can see here that the overshoot is only mildly affected, but the slope is wildly different. This explains why practical results are very different to 29µV/s predicted from a single pulse.

The result is obviously affected by the pulse frequency since this influences the max/min values of the settled waveform. For example, a 0.5Hz (30bpm) pulse train will settle to +2.85 / -0.15mV, and 2Hz (120bpm) waveform settles to 2.4 / -0.6mV.

And … if the waveform is not settled, it depends on which pulse is used. An engineer might run the test and randomly pick the 5th pulse, and later run the test again and pick the 12th pulse, and scratch their head as to why the results are different. So the test should be allowed 20s to settle in order to guarantee consistent results.

But that’s not all. It’s possible that the ECG simulator could use a -50% offset which can effectively double the range of the simulator for pulse waveforms (as used in the SECG). Instead of making a pulse using 3mV/100ms and then 0mV for 900ms, the simulator could use +1.5mV/100ms, -1.5mV/900ms. While the waveform is settling, this initial offset can dramatically influence the result, and can even exceed the 300µV/s limit for the first few pulses. Again, if the test is allowed to run for 20s this effect is eliminated.

This all explains a lot. And it turns out this issue affects any ECG testing where there is a dc offset in the test waveform and the ECGs filter goes down to 0.05Hz. Examples are such as the 200/20ms test and the CAL20160 waveform. More work is required to simulate these waveforms and determine the extent of the impact, but in the mean time, it makes sense to allow these tests 20s to stabilise and fix the test frequency.

Conclusion

Based on the above analysis, all tests involving a 0.05Hz filter should be:

  • allowed 20s to stabilise

  • be tested at 1Hz if not specified, or at least with the test frequency included in the test record to allow the test to be repeated

Ideally, future versions of ECG standards should include both the stabilisation time and test frequency for all tests.

If there are still errors in the above analysis, please feel free to report them.

ECG - input impedance and noise

In ECG standards, clauses such as 201.5.3 cc) of IEC 60601-2-25 require that test signals are accurate to ±1%. Although not explicitly stated in the standard, it’s obvious that this includes noise. If for example a test requires the ECG under test to reproduce a test signal accurately within ±5%, it would make no sense to perform the test if the test signal also had say ±20% noise.

Some engineers however might consider environmental (common mode) noise as a separate issue. ECGs are required to work in noisy environments so they should have the ability to reject common mode noise. Hence testing in a normal “noisy” environment is representative of the real world. This is wrong for two related reasons: first the ECG is anyhow tested for the ability to reject noise including common mode noise; second is that in order to test objectively, we need to start with a low noise environment and then add test signals including noise in a known and accurate way.

As such, while there are no instructions, notes, requirements or methods in the standard to minimise noise, such actions are implicit in the requirement to apply test signals with an accuracy of ±1%. In particular, most test signals are in the order of 1mV, which means noise of just 10µV is significant. Normal methods to minimise noise include using a ground plane under the ECG, cables and test equipment, and connecting the ECG equipment earth (PE or FE) and the test circuit ground to the ground plate.

The input impedance test is by far the most sensitive to noise, and sometimes the normal procedures are not enough. The reason for the high sensitivity to noise is the large imbalance impedance. To understand why this is so, it is useful to review the article on CMRR testing, which explains how CMRR is really a function of leakage currents flowing through the imbalance impedance. It follows that the size of the imbalance impedance directly impacts the size of the CMRR noise on the ECG.

For CMRR testing, the imbalance is 51kΩ, while for the input impedance test the imbalance is 620kΩ, some 12 times larger. This means that the input impedance test is 12 times more sensitive to noise than the CMRR test.

We can do some ball park calculations to illustrate the point. If say in an CMRR test the ECG records a 3mm indication; in voltage terms this is 0.3mVpp from a 10Vrms common mode voltage.

In the input impedance test, the typical test voltage is 3.2mVpp (80% of 40mm channel width @ 10mm/mV), so a 1% error is roughly 0.03mVpp, which is 1/10 of the above CMRR result. Since the set up is 12 times more sensitive to noise, it means the common mode voltage in the input impedance test needs to be less than:

Vcm = 10Vrms / 10 / 12 = 0.083Vrms = 83mVrms

A floating circuit with cables can easily pick up 2~10Vrms of common mode voltage from the environment, and people near a test site tend to make this worse. So, to get this down to 83mVrms may need some special shielding.

Additional measures may include adding a shield above the test set up (in particular for ECG cables), having the operator touch the ground plate during the test, and/or keeping ac power cables away from the test area as far as possible. The thickness of the shielding materials also helps: being very thin aluminium foil is sometimes not much help, but a 1mm thick aluminium plate usually works well.

Although not specified in IEC 60601-2-25 and IEC 60601-2-27, it is also possible to turn on the AC filter to remove 50 or 60Hz noise. The AC filter will reduce the common mode noise, should have no effect at 0.67Hz and may slightly reduce the signal at 30Hz. For example, you may need 3.5mVpp to get 32mm on the ECG due to the AC filter. Since the input impedance test is ratiometric, as long as the filter is on during the whole test the test result will still be valid.

Finally it is worth to note that some environments are naturally quiet while others are incredibly noisy. The input impedance test condition with the 620kΩ in circuit is a good worst case condition to check out the noise levels at different test sites. It can be useful to select a quiet site for all performance tests.

ECGs - 3 Lead tests

It is normal in ECG testing when confronted by large numbers of test permutations to simplify the approach on the assumption that one test is representative. For example, an input impedance test on V1 and V4 can reasonably be considered representative of tests on the other chest leads. And tests with the 10 lead cable is representative of tests with a 5 lead cable. 

One easy mistake though is to extend this to patient monitors that have the option to attach a 3 Lead cable.

In systems with 4, 5 or 10 electrodes, one of the electrodes is used as the "right leg drive", which is used for noise cancellation, both for mains and dc offsets. This function helps the system cope with dc offsets, mains noise (CMRR) and input impedance. 

In systems with 3 leads, there are two possible approaches: one is forget about noise cancellation and hope for the best. Another, more common is to use the displayed lead to decide which two leads are used for measurement, and have the other lead switch to the noise cancellation function. For example, if the normal default Lead II is shown on the display, electrode LA is not used (Lead II = LL - RA) , freeing up this lead for use as noise cancellation. 

You can check for the difference between these approaches by applying a dc offset (e.g. 300mV) to one of the electrodes, and then switching between Lead I, II and III and observing the baseline. If baseline remains constant, it is likely the manufacturer has used the "hope for the best" approach. If the baseline shows a transient when switching the lead displayed (e.g. Lead I to Lead II), it means the hardware circuit is switching the lead with the noise cancellation, and the high pass filter needs time to settle down. 

Either way, system with 3 lead options should be retested. The recommended test in IEC 60601-2-27 include: 

  • sensitivity
  • input impedance
  • noise
  • channel crosstalk
  • CMRR
  • pacemaker pulse (spot check)

For the remaining tests, it seems reasonable that tests on 10 lead configuration is representative. 

In reality though it is really up to the designer to know (and inform) about which tests can be considered representative. This is one of the weak points in IEC 60601 series in that there is no clear point of analysis for representative accessories and options, something which is discussed in another MEDTEQ article on accessories

ECG Leads - an explanation

From a test engineer's point of view, it is easy to get confused with LEADS and LEAD ELECTRODES, because for a typical electrical engineer, "lead" and "electrode" are  basically the same thing. But there is more confusion here than just terminology. How do they get a "12 lead ECG" for a cable with only 10 leads? Why is it that many tests in IEC standards ask you to start with RA, yet the indication on the screen is upside down? Why is it that when you put a voltage on RA, a 1/3 indication appears on the V electrodes?

Starting with this matrix diagram, the following explanation tries to clear up the picture:

LEAD ELECTRODES are defined as the parts that you can make electrical connection to, such as RA, LA, LL, V1 and so on. On the other hand, LEADS are what the doctor views on the screen or print out.

There are a couple of reasons why these are different. Whenever you measure a voltage it is actually a measurement between two points. In a normal circuit there is a common ground, so we often ignore or assume this second reference point, but it's always there. Try and measure a voltage using one point of connection, and you won't get far.

ECGs don't have a common reference point, instead physicians like to see different "views" of the heart's electrical activity, each with it's own pair of reference points or functions of multiple points. One possibility would be to always identify the points of reference, but this would be cumbersome. Instead, ECGs use labels such as "Lead I" or "Lead II" to represent the functions.

For example "Lead I" means the voltage between LA and RA, or mathematically LA - RA. Thus, a test engineer that puts a positive 1mV pulse on RA relative to LA can expect to see an inverted (negative) pulse on Lead I.

Leads II and III are similarly LL-RA and LL-LA. 

The waveforms aVR, aVL and aVF are in effect the voltages at RA, LA and LL respectively, using the average of the other two as the second reference point.

Waveforms V1 ~ V6 (where provided) are the waveforms at chest electrodes V1 ~ V6 with the average of RA, LA and LL as the second reference point.

These 12 waveforms (Lead I, II, III, aVR, aVL, aVF, V1 ~ V6) form the basis of a "12 lead ECG".

Whether you are working with IEC 60601-2-27 or IEC 60601-2-51, you can refer to the diagram above or Table 110 in IEC 60601-2-51 which shows the relationship between LEAD ELECTRODES and LEADS.

Finally, you may ask what is RL (N) used for? The typical mistake is to assume that RL is a reference point or ground in the circuit, but this is not correct. In most systems, RL is not used for measurement. Rather it is used for noise cancellation, much like noise cancelling headphones, and is often call a "right leg drive". It senses the noise (usually mains hum) on RA/LA/LL, inverts and feeds back to RL. For testing IEC 60601-1, engineers should take note of the impedance in the right leg drive, as this tends to be the main factor which limits dc patient currents in single fault condition.

Exercise (test your understanding)

To check your understanding of the matrix, try the following exercise: if a 1mV, positive pulse (e.g. 100ms long) was fed to RA with all other inputs grounded, what would you expect to see on the screen for each lead? The answer is at the end of this page.

Other related information (of interest)

In years gone by, the relationship (matrix) above was implemented in analogue circuits, adding and subtracting the various input voltages. This meant that errors could be significant. Over time, the digital circuits have moved closer and closer to the inputs, and as well the accuracy of remaining analogue electronics has improved, which means it is rare to get any significant error in modern equipment. The newest and best equipment has a wide range high resolution input analogue to digital conversion very close to the input, allowing all processing (filtering as well as lead calculation) to be performed in software.

It is interesting to note that mathematically, even though there are 12 Leads, there are only 8 "raw" waveforms. Four of the 12 waveforms can be derived from the other 8, meaning they are just different ways of looking at the same information. For example, Lead III = Lead II - Lead I. It makes sense, since there are only nine points electrical connections used for measurement (remember, RL is not used for measurement), and the number of raw waveforms is one less than the number of measurement points (i.e. one waveform requires 2 measurement points, 2 waveforms requires at least 3 points, an so on). This is the reason why systems can use 8 channel ADC converters, and also why the waveform data used IEC 60601-2-51 tests (such as CAL and ANE waveforms) uses just 8 channels of raw data to create a full 12 Lead ECG.

Although the standard usually indicates that RA is the first lead electrode to be tested, if you want to get a normal looking waveform from a single channel source, it is best to put the output to LL (F) so that you get a positive indication on Lead II. Most systems default to a Lead II display, and often use Lead II to detect the heart rate. If your test system can select to put the output to more than one lead electrode, select LA and LL, which will give a positive indication on Lead I and Lead II (although Lead III will be zero).

Results of the exercise (answer)

If a +1mV pulse was applied to RA only, the following indications are expected on the screen (or printout). If you did not get these results or do not understand why these values occurred, go back and study the matrix relationships above. For the Lead electrodes, use RA = 1 and for all other use 0, and see what the result is.


Lead

Indication direction

Indication amplitude

I

Negative

1.00mV

II

Negative

1.00mV

III

None

None

aVR

Positive

1.00mV

aVL

Negative

0.50mV

aVF

Negative

0.50mV

V1 ~ V6

Negative

0.33mV


CMRR Testing (IEC 60601-2-25, -2-27, -2-47)

Like EMC, CMRR testing is often considered somewhat of a black art in that the results are unpredictable and variable. This article attempts to clear up some of the issues by first looking at exactly how CMRR works in ECG applications and use of the RL drive to improve CMRR.

It also has a look at the importance of external noise, methods to eliminate and verify the set up is relatively free from external noise.

This application note is intended to support engineers that may already have some experience with CMRR testing but remained confused by variable results in individual set ups.

CMRR analysis from basics

CMRR is often considered a function of op-amp performance, but for the CMRR test in IEC/AAMI standards it turns out the indication on the ECG is mostly due to leakage currents passing through the 51k/47nF impedance.

First, let’s consider the basic test circuit:

For those wondering why the circuit shows 10V and 200pF rather than 20V and 100pF divider found in circuit found in IEC/AAMI standards, this arrangement is the “Thevenin equivalent” and can be considered identical. 

If this circuit was perfect, with the ECG inputs and gain element G floating with infinite input impedance, the 51k/47nF should have no effect and Lead I indication should be zero.

In practice, there will always be some small stray or deliberate capacitance in the system in the order 5 ~ 1000pF. This means the ECG inputs are not perfectly floating and small amounts of leakage will flow in the circuit.  

The main cause of this leakage is the capacitance between each input and shield or ground of the floating ECG circuit, and between that ECG shield/ground and the test system ground.

To understand how these influence the test it is best to re-arrange the circuit in a “long” fashion to appreciate the currents and current flow through the stray capacitance.

In this diagram, stray capacitance Ce-sg is added between the ECG electrode inputs and the ECG circuit ground (which is usually floating).

This capacitance is fairly high due to cable shielding and the internal electronics. Also each electrode has roughly the same stray capacitance. For example, a 12 lead diagnostic ECG measured around 600pF between RA and the shield, with a similar result for LA.

Capacitance Csg-tg between the ECG circuit ground (shield ground) and the test ground is also added.

This value can vary greatly, from as little as 5pF for a battery operated device with the cable well removed from the ground plane, to around 200pF for a mains operated device.

Lets assume Ce-sg are both 100pF, and Csg-tg is 10pF, and try to calculate the current that flows into the circuit. Although it looks complicated, it turns out the 51k/47nF is much smaller impedance compared to the stray capacitance, so as a first step we can ignore it. The total capacitance seen by the source is then a relatively simple parallel/series impedance calculation:  

                Ct = 1/(1/200+ 1/(100+100) + 1/10) = 9pF

We can see here that the largest impedance, in this case Csg-tg (shield to test ground), influences the result the most.

CMRR4.png

Next, we can calculate the total current flowing into the ECG:

                I = 10Vrms x 2π x 50Hz x 9pF = 28nArms

This seems very tiny, but keep in mind ECGs work of very small voltages.

The trick here is to realise that because Ce-sg is similar for RA and LA, this current will split roughly equally into both leads; around 14nA in our example.


RA has the imbalance of 51kΩ/47nF which has an impedance of Z = 40kΩ at 50Hz. When the 14nA flows thought this it creates 0.56mVrms between RA and LA. This is measured normally and on a 10mm/mV results in around 8mm peak to peak on Lead I of the ECG display.

To summarize, the 10Vrms will cause a small but significant amount of leakage to flow into the ECG circuit. This leakage will split roughly the same into each electrode. Any imbalance in the impedance of each electrode will cause a voltage drop which is sensed as a normal voltage and displayed on the ECG as usual.

In the above example, we can see that the capacitance Csg-tg between the ECG shield and the test ground had the largest effect on the result. We assumed 10pF, but increasing this to just 13pF would be enough to change this to a fail result. Many devices have 100pF or more; and the value can be highly variable due to the position of the shielded cable with respect to ground.

With such a small amount of highly variable capacitance having such a big effect, how can ECGs ensure compliance in practice?

The right leg drive

Most ECGs use a “right leg drive”, which is active noise cancellation and is similar to the methods used by noise cancellation headphones. Although noise “cancellation” implies a simple -1 feedback, it is often implemented a medium gain negative feedback loop, and sometimes with shield also driven at the +1 gain.

Regardless of the method, the basic effect is to absorb the leakage current through the RL electrode, which prevents it from creating a voltage across any impedance imbalance (51k/47nF).

In reality these circuits are not perfect, and in particular it is necessary to include a reasonable size resistor in the RL to prevent high dc currents going to the patient especially in fault condition. This resistor degrades the CMRR performance.

The residual indication on most ECGs (usually 3-7mm) is mostly a measure of the imperfection of the RL drive. This will be different for every manufacturer, but generally repeatable. Two test labs testing the same device should get similar results. Two samples of the same device type (e.g. production line testing) should give roughly the same results.

Since each RL drive system is different it can no longer be predicted how the system will react to changes in the position of the cable with respect to the ground plane. Test experience indicates that most ECGs with a RL drive, the indication reduces if the cable is closer to the test ground (Csg-tg capacitance is increased). With normal set ups, the variation is not big. In an extreme case, a test with 12 lead diagnostic ECG a portion of the cable was tightly wrapped in foil and the foil connected to the test ground. In this case the displayed signal to reduced by about 40%.

It is recommended that the ECG cable is loosely gathered and kept completely over the ground plane. Small changes in the cable position should not have a big effect and not enough to change a Pass/Fail decision. In case of reference tests the cable position might be defined in the test plan.

Systems without A Right leg drive

In general, all mains operated ECGs will employ a RL drive as the leakage will be otherwise too high.

In battery operated systems, some manufacturers may decide not use a RL drive.

Without a RL drive the analysis shows the test result will be directly proportional to the leakage current and hence highly sensitive to the cable position with respect to the test ground. The result will increase if the ECG device and cables are closer to test ground plane. This has been confirmed by experiment where a battery operated test sample without RL drive was shown to vary greatly with the sample and leads position with respect to ground plane, with both pass and fail results possible.

With the advent of wireless medical monitoring, there may be battery operated equipment intended for monitoring or diagnostic applications, together with inexperienced manufacturers that may not know the importance of the RL drive. Current standards (-2-25, -2-27) are not written well since they do not define what is done with the cable.

If a RL drive is not used, the above analysis indicates the intended use should be limited to being always worn on the patient and tested similar to IEC 60601-2-47. If the device has long cables and the recorder may be situated away from the patient, an RL drive should be used to avoid trouble.

For ambulatory equipment, the standard IEC 60601-2-47 specifies that the cable is wrapped in foil and connected to the common mode voltage, not the test ground. This is assumed to simulate the cable being close to the patient. This is expected to improve the result, as leakage will be much lower. The test voltage for ambulatory is also much smaller, at 2.8Vrms compared to 20Vrms. As such ambulatory equipment may pass without a RL drive.

External noise

In the actual CMRR test set up, the ECG electrodes are floating with around 10-15MΩ impedance to ground. This high impedance makes the circuit very susceptible to external noise, far more than normal ECG testing. The noise can interfere with the true CMRR result.  

Therefore for repeatable results, the test engineer must first set up to eliminate external noise as far as possible, and the test (verify) that there is no significant noise remaining.

To eliminate the noise the following steps should be taken:

  • Place the equipment under test (EUT), all cabling and the CMRR test equipment on an earthed metal bench or ground plane (recommended at least 1mm thick)
  • Connect the CMRR test equipment ground, EUT ground (if provided) and ground plane together and double check the connection using an ohm meter (should be <0.5Ω)
  • During the test, any people standing near the set up should touch the ground plane (this is an important step, as people make good aerials at 50/60Hz).

To check the set up has no significant noise:

  • Set up the equipment as normal, including the 20Vrms
  • Set RA lead with impedance (51k/47n), check normal CMRR indication appears (usually 3-8mm)
  • Turn the generator voltage off
  • Verify the indication on Lead I or Lead II is essentially a flat line at 10mm/mV. A small amount of noise is acceptable (e.g. 1mm) as long as the final result has some margin to the limit.

If noise is still apparent, a ground plane over the cables may also help reduce the noise. 

Typical Testing Results

Most indications for the 20V tests are in the range of 3-7mm. An indication that is lower or higher than this range may indicate there problem with the set up.

Indications are usually different for each lead which is expected due to the differences in the cable and trace layout in the test equipment, test set up and inside the equipment under test. Therefore, it is important to test all leads. 

The 300mVdc offset usually has no effect on the result. However, the equipment has to be properly designed to achieve this result - enough head room in the internal amplifiers. So it is again important to perform the test at least for representative number of leads.

If the test environment is noisy, there may be "beating" between the test signal frequency (which is usually pretty accurate) and real mains frequency, which is not so accurate. This can be eliminated by taking special precautions with grounding and shielding for the test area. Solid metal benches (with the bench connected to the test system ground) often make the best set up. 

And that 120dB CMRR claim? 

Some ECG manufacturers will claim up to 120dB CMRR, a specification which is dubious based on experience with real ECG systems. The requirement in standards that use the 10V test is effectively a limit of 89dB  (= 20 log (0.001 / (2√2 x 10)). A typical result is around 95dB. Although it might not seem much between 95dB and 120dB, in real numbers it is a factor of about 20. 

It is likely that the claim is made with no imbalance impedance - as the analysis above shows, the imbalance creates the common mode indication, and without this imbalance most floating measurement systems will have no problem to provide high CMRR. Even so, in real numbers 120dB is a ratio of a million to 1, which makes it rather hard to measure. So the claim is at best misleading (due to the lack of any imbalance) and dubious, due to the lack of measurement resolution. Another challenge for standards writers?     

ECG Filters

This article is transferred from the original MEDTEQ website and written around 2010. The material on the 3mV/100ms impulse test for 0.05Hz filters (last item on this page) contains errors, which is discussed in a separate article.

ECG filters can have a substantial effect on the test results in IEC 60601-2-25, IEC 60601-2-27 and IEC 60601-2-47. In some clauses the standard indicates which filter(s) to use, but in most cases, the filter setting is not specified. One option is to test all filters, but this can be time consuming. Also, it is not unusual to find that some tests fail with specific filter settings. This section is intended to give some background on the filters and the effect of filters, so test engineers can decide which filter settings are appropriate.

Most test engineers covered filters at some point in their education, but that knowledge may have become rusty over time, so the following includes some information to brush up on filter theory while heading into the specifics of ECG filters.

Section 1: The technology behind filters

What is a filter?

In general, filters try to remove unwanted noise. Especially in ECG work, the signal levels are very small (around 1mV), so it is necessary to use filtering to remove a wide range of noise. This noise may come from an unstable dc offset from electrode/body interface, muscle noise, mains hum (50/60Hz), electrical noise from equipment in the environment and from within the ECG equipment itself, such as from internal dc/dc converters.

A filter works by removing or reducing frequencies where noise occurs, while allowing the signal frequency through. This can be done in either hardware or software. In modern systems, the main purpose of hardware filtering is to avoid exceeding the limits of the analogue system, such as opamp saturation and ADC ranges. Normally a 1mV signal would be amplified around 100-1000 times prior to ADC sampling, if this signal had even 10mV of noise prior to amplification, we can expect amplifiers to saturate. The main limitation of hardware filters is that they rely on capacitors, the value of which cannot be controlled well both in production and in normal use. Thus software filtering is usually relied on for filter cut-off points that can be controlled accurately, allowing also advanced filter models and user selected filters to be implemented. 

What are typical types of ECG filtering? Why are there different filters?

Ideally, a filter should remove noise without affecting the signal we are interested in. Unfortunately, this is rarely possible. One reason is that the signal and noise may share the same frequencies. Mains noise (50/60Hz), muscle noise and drift in dc offsets due to patient movement all fall in the same frequency range as a typical ECG. Another problem is that practical filters normally don't have a sharp edge between the "pass" band and the "cut" band. Rather there is usually a slow transition in the filters response, so if the wanted and unwanted signals are close we may not be able to remove the noise without removing some of the desired signal.

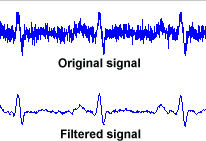
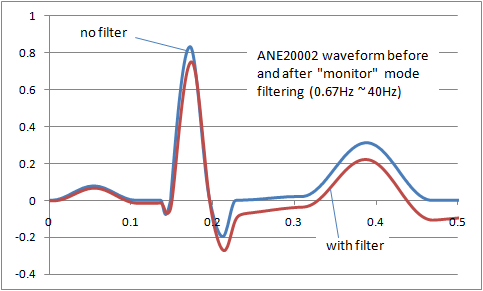
The result is that filters inevitably distort the signal frequency. The image right shows the distortion of the ANE20002 waveform from IEC 60601-2-25 with a typical "monitor" filter from 0.67Hz to 40Hz. A balance has to be found between removing noise and preserving the original signal. For different purposes (monitoring, intensive care, diagnostic, ambulatory, ST segment monitoring etc) the balance shifts, so we end up with a range of filters adjusted to get the best balance. Some common examples of ECG filters are:

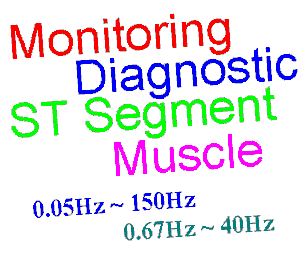
Diagnostic:   0.05Hz ~ 150Hz    
Widest for diagnostic information, assumes a motionless, low noise environment

Ambulatory, patient monitoring:    0.67Hz ~ 40Hz 
Mild filtering for noisy environment, principally to detect the heart rate

ST segment:  0.05Hz ~    
Special extended low frequency response for ST segment monitoring (more detail below)

Muscle, ESU noise:   ~ 15Hz   
Reduced higher frequency response to eliminate muscle noise and other interference such as ESUs

While ECGs could be referred to as using a band pass filter, the upper and lower frequencies of the pass band are sufficiently apart that we can discuss them seperately as low pass and high pass filters.

What is a low pass filter? What distortion is caused by low pass filtering?

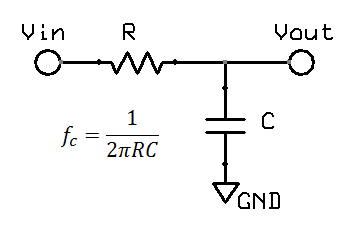
A low pass filter is often found in electronic circuits, and works by reducing high frequency components. The most common form of a hardware low pass filter is a simple series resistor / capacitor: at low frequencies the capacitor is high impedance relative to the resistor, but as the frequency increases the capacitor impedance drops and output falls. A circuit with only one resistor/capacitor is a "single pole filter". Due to origins in audio work and similar fields, filters are normally specified by the frequency at which there is a "3dB reduction", or where the output voltage is around 71% (0.707) of the input. While this may sound large, in the audio field the dynamic range is so large that a log scales are required, and on this scale 3dB reduction (30%) is not so big. For a large dynamic range, units of decibels (dB) are more convenient. Decibels originated in power, using simple scale of 10 log10(Pout / Pin). In electronics, measurement of voltage is more common, thus we end up with 20 log10(Vout / Vin). The factor of 20 rather than 10 reflects the square relationship between voltage and power, which in the log world is an additional factor of 2.    

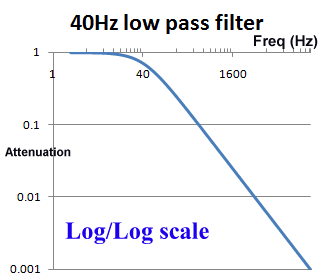
The use of log scales can be misleading. Graphically in the log/log scale, the output of a single pole filter is basically 1:1 (100%) in the "pass band", and then drops of steeply as the frequency increases, quickly reaching levels of 1% (0.01) and lower.  

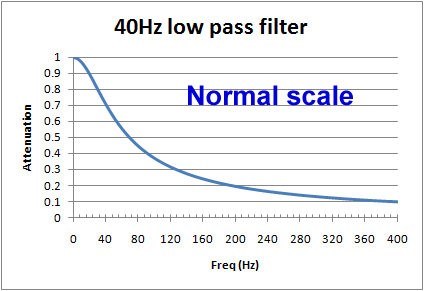
However, if we look at a graph using a normal scale (non-log), we see that around the frequency of interest, the cut of is actually pretty slow. For example, for a 40Hz filter, at 20Hz there will still be more than 10% reduction, and at 100Hz, still 37% of the signal is getting through. When testing an ECG's filter response and other characteristics, is it common to see effects due to filters above and below the cut off frequencies.

In software, filters can be used which closely approximate hardware filters, but other complex forms are possible. Sharper cut off between the pass band and cut band can also be achieved. Great care is needed with software filters as unexpected results can easily occur due to the interplay between sampling rates and the chosen methodology.  

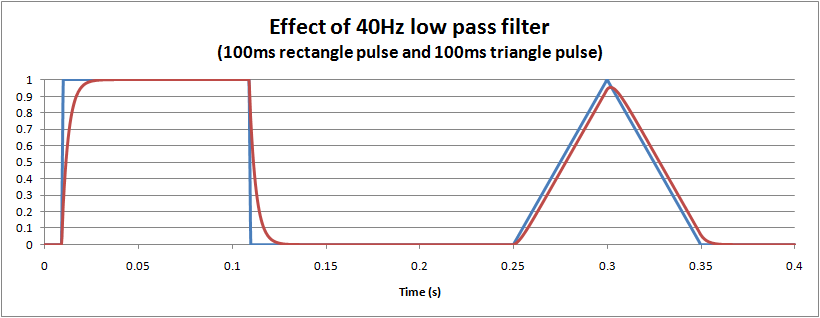
The distortion caused by a hardware (or equivalent software) single pole low pass filter is easy to visualise: it essentially dampens and slows the waveform, much like suspension in a car. The following graph shows the effect of a 40Hz monitoring filter on 100ms rectangle and triangle pulses. For the triangle it is interesting to note that there is about a 5% reduction in the peak measured, and also a small delay of around 3ms.

What is a high pass filter? What are the effects?

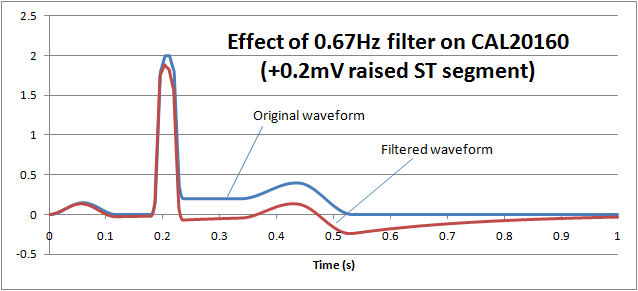
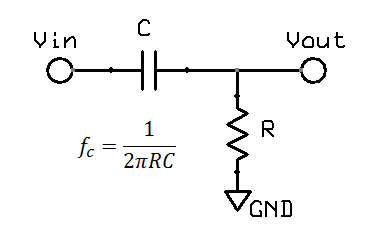
High pass filters are obviously the opposite of a low pass filters. In hardware, a single pole filter can be made out of a capacitor in series with a resistor. The corner frequency is the same, and the frequency response is a mirror image (vertical flip) of the low pass filter.

The terminology associated with ECG high pass filters can be confusing: while the filter is correctly termed a "high pass filter", it affects the low frequency response, around the 0.05Hz to 1Hz region. So it is easy to get mixed up between "high" and "low".

The main intention of a high pass filter in ECG work is to remove the dc offset which in turn is largely caused by the electrode/gel/body interface. Unstable voltages of up to 300mVdc can be produced. In diagnostic work, the patient can be asked to stay still so as to reduce these effects, allowing the filter corner to be reduced down to 0.05Hz. For monitoring and ambulatory use, a 0.67Hz corner is common.

For long term periodic waveforms the main effect is to shift or keep the waveform around the centerline, known as the "baseline" in ECG. This is the same as using the AC mode on an oscilloscope to view only ac noise of 50mVpp on a 5Vdc supply rail. Most test engineers have little problem to understand this side of high pass filters.  

However, for short term pulses, the effects of high pass filters on waveforms are not so easy to visualise. In particular, it is possible to get negative voltages out of a positive pulse waveform, and also peak to peak values exceeding the input. These effects cannot occur with a low pass filter. The hardware filter circuit shown just above, together with the graph below can help to understand why this happens. Initially the capacitor has no charge, so that when a step change (1V) is applied, the full step is transferred to the output. Then the capacitor slowly charges according to the circuit's time constant. For a filter with 0.67Hz, after 100ms, the capcitor is charged to around 0.34V. When the input suddenly drops to 0V, the capacitor remains charged at 0.34V, but the polarity is negative with respect to Vout. The output voltage is Vout = Vin - Vc = 0 - 0.34 = -0.34V. As long as the input remains at 0V, the capcitor then slowly discharges back towards 0V. In this way we can get negative voltages from a positive pulse, a peak to peak voltage of 1.34V (exceeding the input), and finally long slow time constants resulting from short impulses.  

This long time constant can cause problems in viewing the ECG trace after large overloads, such as during defibrillator pulses or a temporary disconnected lead. A 0.67Hz high pass filter has a 0.25s time constant, which although is short can still take time since the overloads are in the 1V level, 1000 times higher than normal signals. For these reasons, ECGs are often provided with "baseline reset" or "de-blocking" function to reset the high pass filter. Typically this is an automated function which in hardware filtercan be done by shorting the capacitor (e.g. analogue or FET switch), or in software filters is simply clearing a result back to zero. 

Diagnostic filters and other filters that go down to 0.05Hz have a much slower time constant, so it can take 10-15s for the signal to become visible again. Even after an automated baseline reset there may be residual offsets of 5-50mV which keep the signal off the screen. This can be a serious risk if such filters are used in intensive care patient monitoring. Patient monitors are often provided with both diagnostic and monitoring filters, and while they pass defibrillator and 1V 50/60Hz overload tests with the monitoring filter, they fail when tested with a diagnostic filter setting. This is a subject which can cause conflict as the standard does not define which filter to use, and manufacturers often argue that only the monitor filter should be tested. However, basic risk management indicates that regardless of the filter setting, the baseline reset should work effectively. It is fairly obvious that such a filters with 0.05Hz would not be selected for defibrillation, however, it is also unlikely that if the patient monitor was already set to diagnostic mode prior to an emergency situation , we cannot reasonably expect the operator to remember or have the time to mess around changing filter settings. Also, the technology to detect and reset the baseline after overloads is well established.

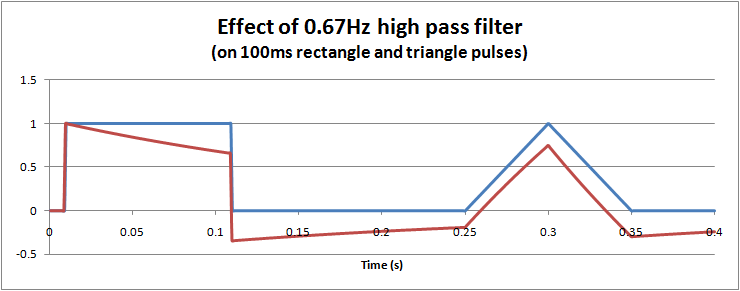
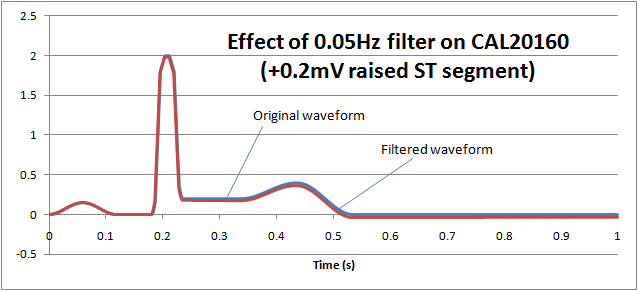
ST filters are also common in patient monitoring and create a similar problem. The purpose of the filter is to preserve the "ST segment" which occurs between the QRS pulse and T wave and can be an important diagnostic indicator. The following graph shows how normal monitoring ECG high pass filter of 0.67Hz on the CAL20160 waveform from IEC 60601-2-25 (+0.2mV elevated ST segment) essentially removes the ST segment:

If we reduce the low frequency response (high pass filter) down to 0.05Hz, we can see that the ST segment remains largely undistorted, allowing diagnostic information to be retained:

Notch filters (mains hum filters, AC filter, 50/60Hz)

Notch filters combine both high and low pass filters to create a small region of frequencies to be removed. For ECGs, the main target is to remove 50Hz or 60Hz noise. Because mains noise falls in the region of interest (especially for diagnostic ECGs), the setting of "AC filter" is usually optional. ECG equipment already contains some ability to reject mains noise even without a filter (see right leg drive) so depending on the amount of AC noise in the environment, an AC filter may not be required. A good check of your ECG testing location is to compare the signals with and without the AC filter on.

Some systems automatically detect the mains frequency, others are set by the user or service personnel, while others use a single notch filter covering both 50/60Hz.

High "quality" notch filters can be created in software that target only 50 or 60Hz, but the drawback of these filters is they can create unusual ringing especially to waveforms with high rates of change. IEC 60601-2-51 has a special waveform (ANE20000) which confirms that the extent of ringing is within reasonable limits.

Similar to the diagnostic filter, the question again arises as to whether patient monitors should pass tests with or without the AC filter. In particular this causes problems with the 40Hz high frequency response requirement, as some systems may fail this response with a 50Hz AC filter on. There is no simple answer for this: 40Hz and 50Hz are very close, so to comply with the 40Hz requirement with a 50Hz notch filter implies advanced multipole filtering. But multipole filters have risks of distortion such as ringing. On the other hand, use of AC filters can be considered "normal condition", so to argue that a test is not required with the AC filter on implies that the 40Hz frequency response is not really important, which would raise the question what upper frequency response is important. ANSI/AAMI (US) standards have an upper limit of 30Hz for patient monitors, which also complicates the situation.

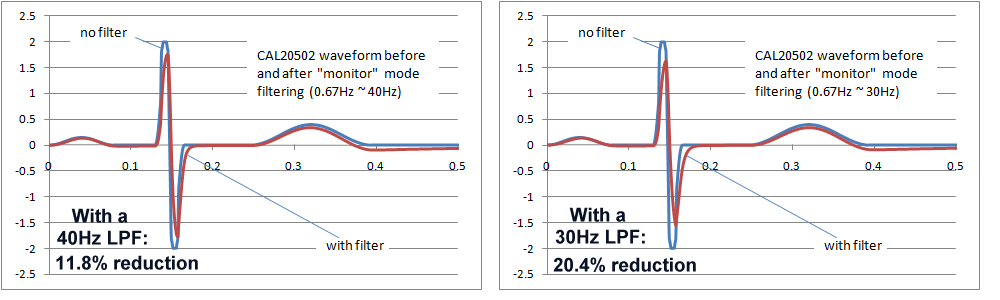
Ultimately, the final decision would require a careful study of the effects of the AC filters on waveforms found in real clinical situations, which also depends in the intended purpose. In particular neonatal waveforms are likely to have higher frequency components, so the high frequency response including AC filters will have the greatest impact only if neonatal patients are included in the intended purpose. The following images show the effects of 40Hz and 30Hz single pole filters on IEC 60601-2-51 waveform CAL20502 (intended to simulate neonatal ECGs). As the images show, the effects are not insignificant. Both filters reduce the peak to peak indication, with the 30Hz filter around 20%, which may be exceeding reasonable limits. However, of course these are single pole filter simulations, which would not relfect the response of more complex filter systems.  

Notes on advanced filtering

The simulations above are based on simple single pole filters, which distort the signal in predictable ways and are easy to simulate. Complex multipole and digital filters can have far better responses but there are risks of substantial overshoots and ringing. Experience from testing indicates that manufacturers tend to prefer simple filters, but occasionally use more complex filters where strange results in testing are possible. These results may or may not representative of the real world because the test signals often contain frequencies that don't exist in the real world, such as small digital steps caused by arbitrary waveform generators, or rectangle pulses with excessively fast rise times. This needs to be kept in mind during testing and discussed with the manufacturer.

Section 2: Particular requirements from standards affected by filters

Sensitivity, accuracy of leads, accuracy of screen and printing, similar tests

For tests involving sensitivity (e.g. confirming 10mm/mV within ±5%) and accuracy of lead calculations (such as Lead I = RA - LA), it makes sense to use diagnostic filter with the AC filter off. The nature of these tests is such that filters should not impact the result, with the effects of filters being handled seperately. The widest frequency response ensures that the waveforms viewed on the screen are essentially the same as the input waveforms, avoiding some complications due to waveform distortion which are irrelevant to the tests. This assumes that the test environment is sufficiently "quiet" so that mains and other noise does not also influence the result.

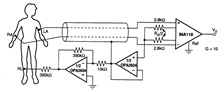
Common Mode Rejection Ratio

As IEC standards point out, the CMRR test should be performed with the AC filter off, if necessary by special software. If avaliable, a patient monitor should be tested using the widest (diagnostic) filter mode, which is worst case compared to monitor mode. One point to note is that ANSI/AAMI standards (at least, earlier editions) do not require the AC filter to be off, a key difference to the tests in IEC standards.

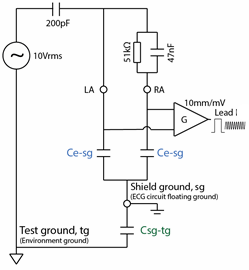
Input impedance test

Due to the high imbalance in one lead (620k/4.7nF), the input impedance test is particularily susceptable to mains noise. Since this is a ratiometric test, the filter setting should not affect the result. If possible, the user should select the mains notch filter to be on, and use the monitoring mode. Other filter settings (like muscle, ESU) might reduce the noise further, but they may also make it difficult to measure at 40Hz  as the signal will be substantially attenuated. 

Frequency response test

For frequency response tests, including the 200ms/20ms triangle impulse test, obviously all filters should be tested individually. However, there may be discussions as indicated above as to whether compliance is necessary for all settings, which in turn may be based on clinical discusssion. For example, it is obvious that special filters in highly noisy environments (e.g. muscle, ESU) may not meet the 40Hz high frequency response requirment from IEC 60601-2-27. Test labs should simply report the results. For regulatory purposes, manufacturers should discuss the clinical impact where appropraite. For example, a muscle filter with a cut off of 15Hz seems clearly inappropriate for use with neonates. 

For IEC 60601-2-27 (0.67Hz to 40Hz), practical tests found that some manufacturers follow the normal practice in frequency response testing of using the input as the reference. For example setting the input to exactly 1mVpp (10mm) and then measuring the output. While this is logical, the standard requires that the output at 5Hz is used as the reference point. In some cases, the 5Hz output can be significantly higher than the input as the result of multipole filters, leading to differences between manufacturer test results in independent laboratory test results.

For IEC 60601-2-25, frequency sweeps up to 500Hz using digital based systems usually finds some point where beating occurs, as a result of the sample rate of the digital function genorator being is a multiple or near multiple of the ECG's sampling rate. For this reason, it is always useful to have a back up analogue style function genorator on hand to verify the frequency response.

Pacemaker indication

Most modern ECGs use a blanking approach to pacemaker pulses: automatic detection of the fast edge of the pacing spike, ignoring the data around the pulse and then replacing the pulse with an artificial indication on the ECG screen or record. If this approach is taken, the filter settings usually do not affect the test results. However, some systems allow the pulse through to the display. In this case, the filter settings can dramatically affect the result. Consult the operation manual prior to the test to see if any special settings are necessary for compliance.  

Low frequency impulse response test (3mV 100ms)

The low frequency impulse response test is only intended where the frequency response extends down to 0.05Hz. For patient monitors and ambulatory ECGs, this will typically only apply for special settings such as diagnostic filters or ST-segment analysis. There appears to be an error in IEC 60601-2-47 since it requires the test for all modes, but it is obvious that filters that do not extend down to 0.05Hz cannot pass the test.

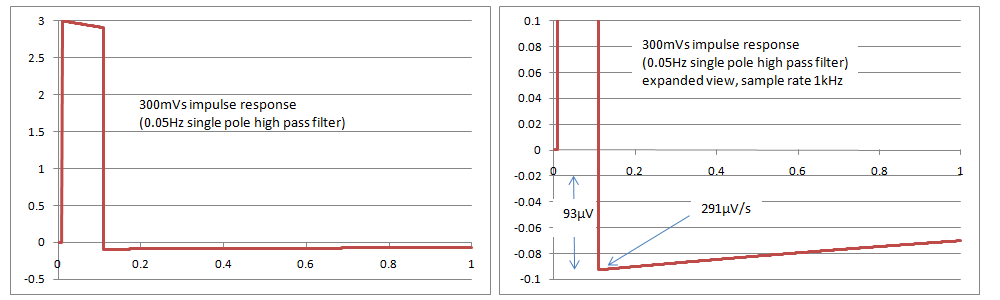
Simulations with a single pole filter 0.05Hz have found that the results just pass the tests in IEC 60601-2-27 and IEC 60601-2-47, with an overshoot of 93uV and a slope of 291uV/s, compared to the limits of 100uV and 300uV/s in the standards. It appears that IEC 60601-2-51 cannot be met with a single pole filter, as it has a slope requirement of 250uV/s. The rationale in the standard indicates that this is intentional. It is very difficult if not impossible to confirm compliance based on inspection of print outs as the values are very small, so it may require digital simulations and assistance from the manufacturer, with the full system test (analogue signal through to the printout) being used only for confirmation. The following graphs show simulated responses for 0.05Hz single pole filter, both overall and a close up of the overshoot

 Any questions or comments, please feel free to contact peter.selvey@medteq.jp